Rhino 5.0 Status - Blocks and Inserts
Rhino 5.0 has support for nested linked block definitions.
Creating a linked block definition
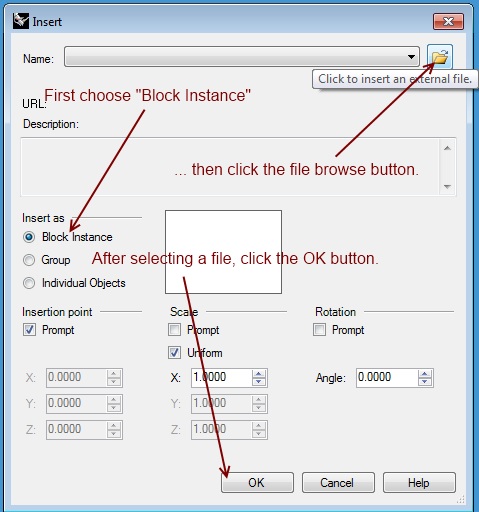
Run the “Insert” command. This will open the “Insert” dialog.
- In the “Insert as” box select the “Block Instances” radio button.
- Use the File browse button to select the model you want to use as linked block definition
- Click the OK button.
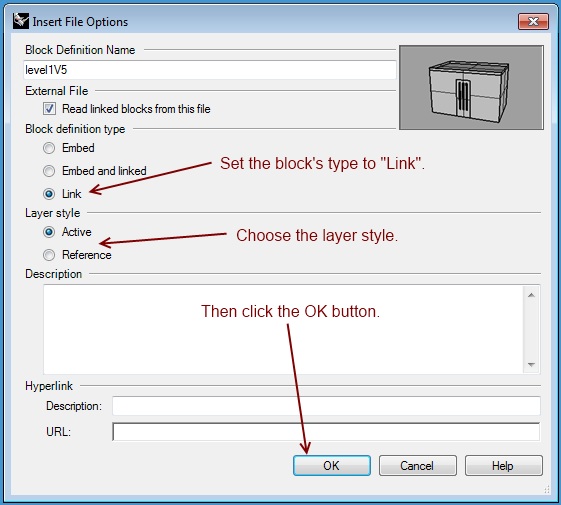
When you click the OK button in the “Insert” dialog, the “Insert File Options” dialog will appear.
- In the “Block definition type” box select the “Link” radio button.
- In the “Layer style” box, select the appropriate style. For more information about “active” and “reference” layer styles, see linked block layer names.
- Click the OK button.
After you click the OK button in the “Insert File Options” dialog, you can use the mouse to position the block or type in the coordinates of the insertion point.
Nested linked blocks
Sometimes it is helpful to break a complex project model into components and reference the components as blocks. The zip archive superblockv5.zip contains these models:
- V5\
- projectV5.3dm
- BuildingV5\
- buildingV5.3dm
- PartsV5\
- awnings-roundV5.3dm
- awnings-straightV5.3dm
- guidelinesV5.3dm
- level1V5.3dm
- level2V5.3dm
- roofV5.3dm
- SiteV5\
- siteV5.3dm
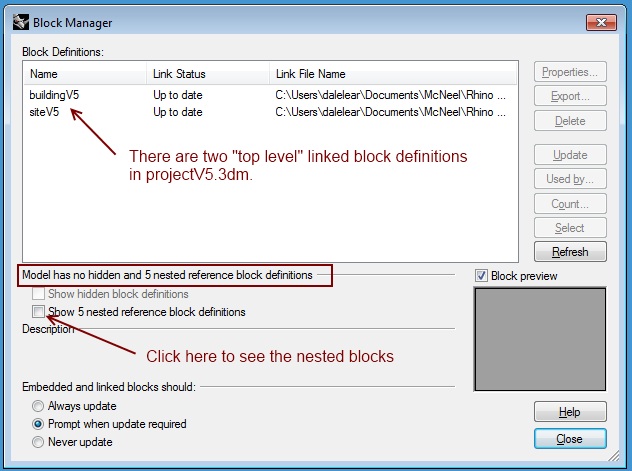
Open the file “…\V5\projectV5.3dm”. The projectV5.3dm model has two linked blocks, one is the building and the other is the site.
If you run the “BlockManager” command you will see the “building” and “site” blocks. You also see that there are 5 “nested blocks”
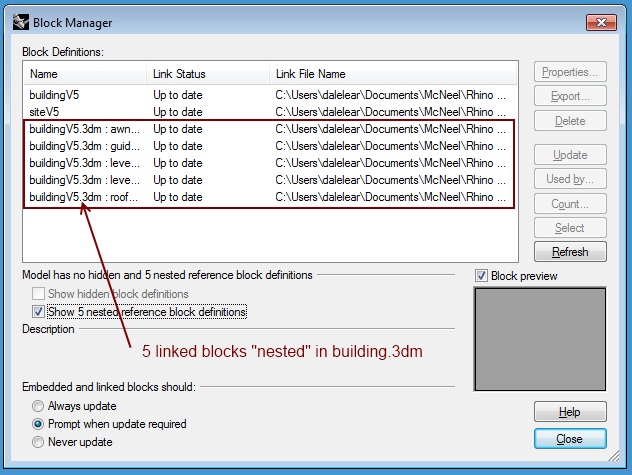
To see what these nested blocks are, click the “Show 5 nested reference block definitions” check box.
You can see the buildingV5.3dm model has five linked blocks, awnings-round, level1, level2, roof and guidelines.
Editing nested linked blocks
Rhino allows you to use the “BlockManager” to look at and modify the properties of “nested” linked blocks. It is important for you to remember that any changes you make to “nested” linked block settings are temporary and are never saved. When you want to permanently change a linked block setting, you must edit the model containing the linked block.
For example, you can experiment with varying what the building model looks like with a different awning style by selecting the “buildingV5.3dm : awnings-…” block, clicking the “Properties” button, and changing the file from awnings-roundV5.3dm to awnings-straightV5.3dm. If you want to permanently change the awnings from round to straight, you must open the buildingV5.3dm model and edit the awnings bock in that model.
Back to Rhino 5.0 Status


