Zoo Installation and Configuration
Obsolete: this article is outdated. Read about the newest version of The Zoo
Product: Zoo 4.0
Summary: Tips for installing the Zoo Workgroup License Manager
The Zoo lets you share Rhino, Flamingo, Penguin, and Bongo licenses (CD-Keys) among users on the same network workgroup. Zoo 4.0 is designed to work with Rhino 4.0 CD-Keys as well as CD-Keys from earlier versions of Rhino, Flamingo, Bongo, and Penguin.
Topologies
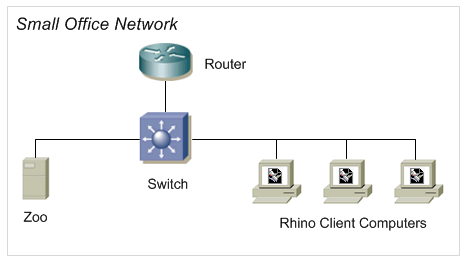
1. Small Network
The Zoo and all Rhino client computers are inside the same network subnet, virtual LAN and behind the same firewall. The Zoo works with all Rhino client computers without any additional network configuration.
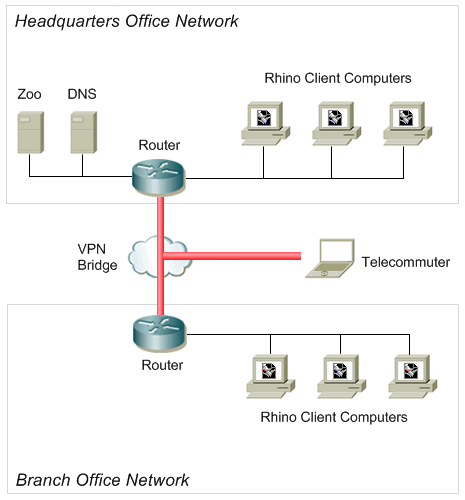
2. Routed Network
The Zoo is on the other side of a router from the Rhino client computers. The Rhino client computers can be in different network segments, behind different routers, and on different virtual LANs. Extra network or client computer configuration is required for Rhino to find the Zoo. See Configuring Zoo to work on Routed Networks for more details.
Installation
- If you are installing on a system that is already running an earlier version of the Zoo, you need to stop the Zoo before installing Zoo 4.0.
- If the Zoo 4.0 installer detects a previous release of the Zoo installed on the system, it defaults to installing in the same folder as the previous release.
- If you install Zoo 4.0 into the same folder as a previous release, the installer will make backup copies of both the previous release of Zoo (Zoo.exe) and its license file (Zoo.key). Also, the first time you run Zoo 4.0, it will automatically import the old licenses.
Configuration
- Start Zoo 4.0
- Add your CD-Keys to Zoo 4.0, including any Rhino, Penguin, Bongo, Brazil, or Flamingo keys you plan to use.
- Start the Zoo service.
Configuring Zoo to work on routed networks
By default, Rhino looks for the Zoo by broadcasting a message on your network. This works great inside one VLan or subnet, so long as all the computers are on the same side of the router. But if you have multiple VLans, you'll need more configuration for this to work.
Routed network configuration options
Select only one of the following configuration options:
- DNS: Set up a DNS txt record on your DNS servers, so that Rhino can find the Zoo without any additional configuration on the client.
- Registry keys: Create a registry key on each client machine. If you do not have DNS, or you do not have the ability to change DNS, this is your option.
To set up DNS:
- Determine the name of the domain to which each client belongs. Right-click My Computer, then click Properties. The Domain name is listed in the Computer Name tab of the System Properties dialog box.
- On the primary DNS server for your domain, create a new TXT record with the format Zoo4=<hostname> where <hostname> is the NetBIOS host name. For example, if the Fully Qualified host name is ZooServer.bcn.es.mycorp.com, and the domain is bcn.es.mycorp.com, then the NetBIOS host name is ZooServer.
- Test the DNS configuration from the client using ZooDnsResolver tool included in the Zoo Bonus Tools.
To set up registry keys on each computer:
- On each computer that runs Rhino 4.0, create the following registry key if it does not already exist: HKEY_LOCAL_MACHINE\Software\McNeel\RhinoLM
- In the RhinoLM key, create a new String Value named zoo4.
- Set the data for the zoo4 value to the NetBIOS host name for the Zoo server. For example, if the Fully Qualified host name is ZooServer.bcn.es.mycorp.com, and the domain is bcn.es.mycorp.com, then the NetBIOS host name is ZooServer.
- For assistance in creating this registry key, use the SetZooServer tool included in the Zoo Bonus Tools.
Note to users of x64-based versions of Windows
Computers that are running an x64-based version of Windows use a different registry layout to handle both 32-bit and 64-bit programs.

• Native mode 64-bit programs run in Native mode and access keys and values that are stored in the following registry sub key:

HKEY_LOCAL_MACHINE\Software

• 32-bit programs run in WOW64 mode and access keys and values that are stored in the following registry sub key:

HKEY_LOCAL_MACHINE\Software\WOW6432node

Rhino 4.0 is a 32-bit application. Thus, if Rhino 4.0 is running on an x64-based version of Windows, you will want to add the Zoo Registry Key Lookup entry in this location:

HKEY_LOCAL_MACHINE\Software\WOW6432node\McNeel\RhinoLM
Miscellaneous
- The Zoo was not designed to work across a WAN. Yet some people have been able to tweak their network settings and get it to work. We have not tested or certified that configuration in house.
- Here are the basic requirements:
- Make sure all machines are a member of the same Windows domain.
- Not recommended: On all firewalls, open UDP Ports 137 and 138, as well as TCP Port 139. Note that this is a major security vulnerability. We do not recommend opening these ports to general internet access. Search the internet for “NetBIOS security vulnerabilities” to learn more.
- We recommend a VPN that assigns a unique IP to each machine.
- The Zoo may not be compatible with Network Address Translation (NAT). We haven't done an exhaustive test to determine whether it works.
- Make sure only one Zoo is running on the domain. Most Zoo problems occur because there is another test Zoo (sometime on the same machine that is trying to run Rhino) causing problems with Mailsot collisions.

