Installing Rhino for Windows in a School Lab
The issue when installing Rhino on lab or classroom computers, is that often it works for the Admin. However when the a limited rights user logs in to the computer, Rhino can no longer open and reports that it cannot find a license.
There are two parts to configuring Rhino to use a LAN Zoo server.
1. The Registry Key: Specify the LAN Zoo DNS servername (prefered) or IP. IP is reset if you dynamic IPs. To you the IP you need to remove the IP from the dynamic range.)
2. Write the license file to the local computer.
This only needs to be done once, correctly of course. If done correctly, any user that logs into the computer can open and run Rhino.
The main problem here is that the Admin writes to the registry in the Admin user Hive. This occurs when Rhino is opened normally and the LAN Zoo server name is entered. When normal users logged into the computer, they are not allowed to read this area.
The solution is to write the registry key to the HKEY_LOCAL_MACHINE → SOFTWARE\Wow6432Node\McNeel\Rhinoceros\6.0\License Manager area. This will allow any user on the computer to see the server key. This is done when you open Rhino as an admin and write the LAN Zoo server key.
How to Install Rhino in a Lab
1. Download and install the Zoo and add your Rhino LAB key.
2. Login to student computer as Admin or any account at will allow an install.
3. Download your current Rhino installer and install.
4. When the install is complete, there will be a program Rhino icon on the Desktop.

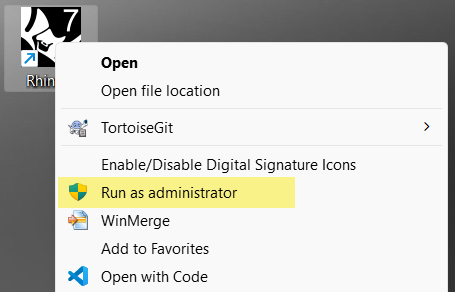
5. Right Mouse Button click the icon. This menu will pop up.
6. Pick Run as Administrator
Why? This is a critically important step. As admin, Rhino will run elevated and be able to write the key to the HKEY_LOCAL_MACHINE hive so any users can reference it. If you just open with the left mouse button, Rhino writes the key to HKEY_CURRENT_USER hive and no other user will be able to reference it.
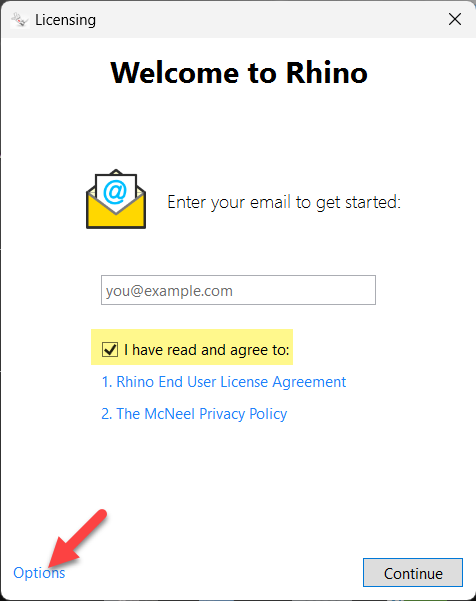
7. Dialog appear with message, Rhino needs a license to run. Check I have read and agree.
8. Pick on Options that has now appeared in the lower left corner.
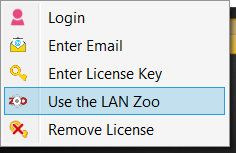
9. Select Use Lan Zoo.
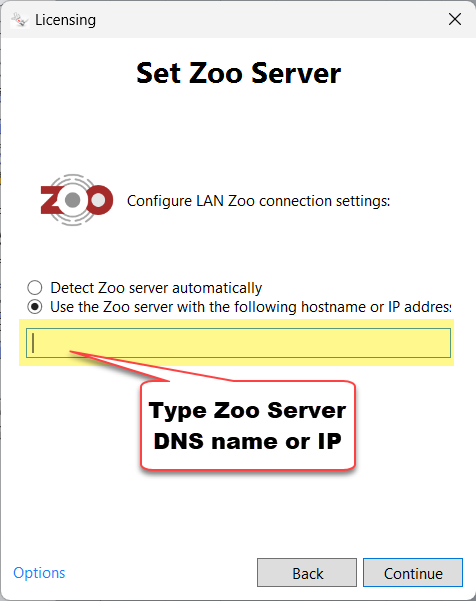
10. Select Use Zoo Server with following host name or IP. Then type the hostname or IP into the text field.
Pick the Continue button.
11. Now Rhino should open.
12. Close Rhino and logout as Admin. Login as a Student or low level user.
13. Open Rhino.
Why does it open? When logged in as student, Rhino looks to the HKEY_CURRENT_USER hive, and finds that there is no key for the LAN Zoo server. It continues to look in the HKEY_LOCAL_MACHINE hive, and finds the key that the Admin had previously written. Rhino then contacts the named LAN Zoo server through TCP port 80 and is handed a Rhino license. It also verifies the license with the local license file in C:\ProgramData\McNeel\Rhinoceros\6.0\License Manager\Licenses.
Reference:
How Does Rhino for Windows Find a LAN Zoo Server?
Lastedit: Sept-15-2023


