Sidebar
Brazil for Rhino
Rendering jewelry in Brazil for Rhino
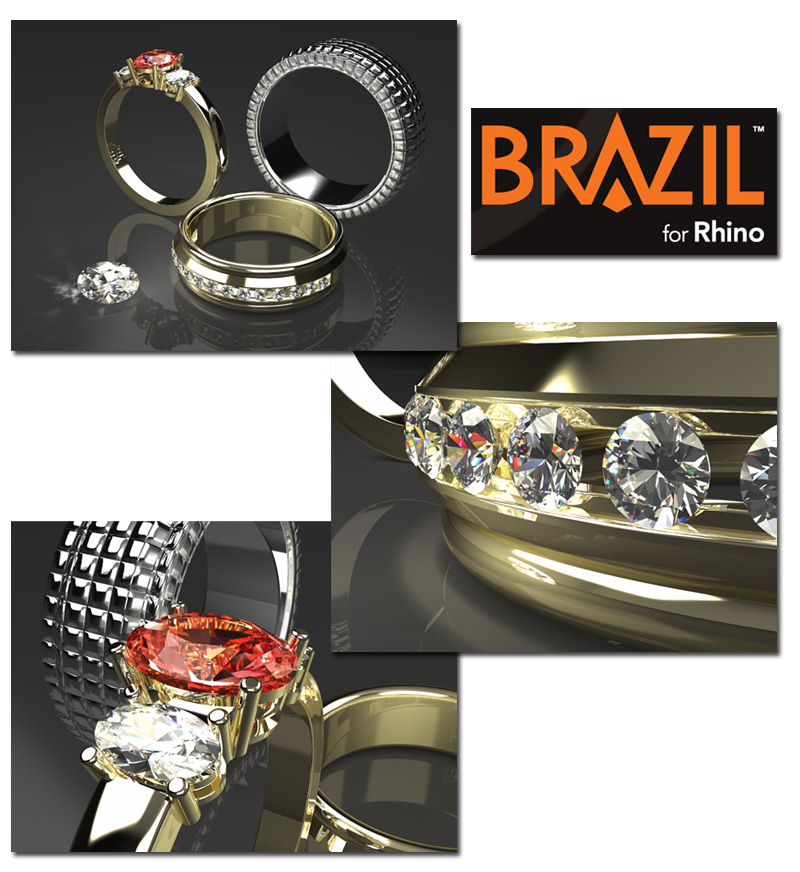
This tutorial covers techniques for rendering jewelry models with Brazil for Rhino. This process uses advanced features such as caustic photons, custom index of reflection, and refraction values.
Brazil Settings
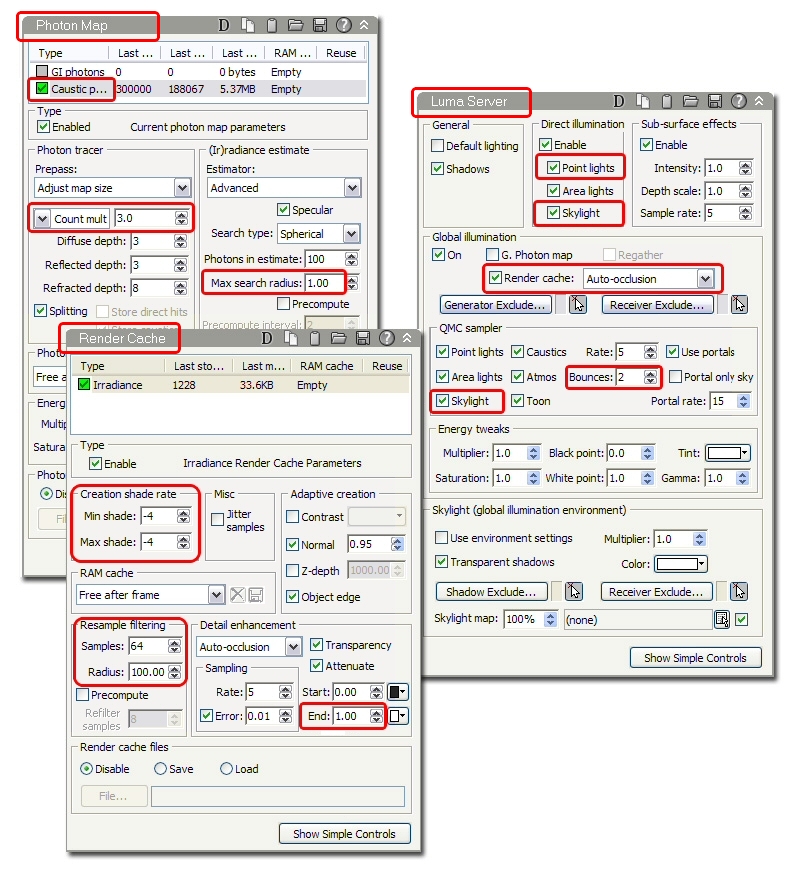
The screen shots of the Brazil Settings dialog box below show the detailed controls for three sections of this dialog: Luma Server, Photon Map, and Render Cache. The areas that have been changed from the default settings are outlined in red.
Luma Server settings
This scene contains two point lights that supply both direct and global illumination (GI). The skylight also supplies direct and global illumination. To use GI for the skylight, set the number of Bounces to 2 or more.
Render Cache settings
The Creation shade rate, Resample filtering, and End parameters dramatically reduce the render time required for the resolution specified in this example.
Photon Map settings
Brazil can use either GI (global illumination) or Caustic photons. This scene uses Caustic photons. Caustics are the phenomena of dispersed light bouncing off reflective surfaces or through translucent materials. Since gemstones scatter light beautifully, using this effect makes the rendering more engaging.
The most important Photon Map setting is the Max Search Radius. The larger this value is, the farther Brazil will search for scattered photons. The lower this value, the faster the caustic photon map will be calculated. A value of 1 renders this scene quickly while still producing the scattered flecks of light seen beside the diamond on the ground plane.
Light Properties
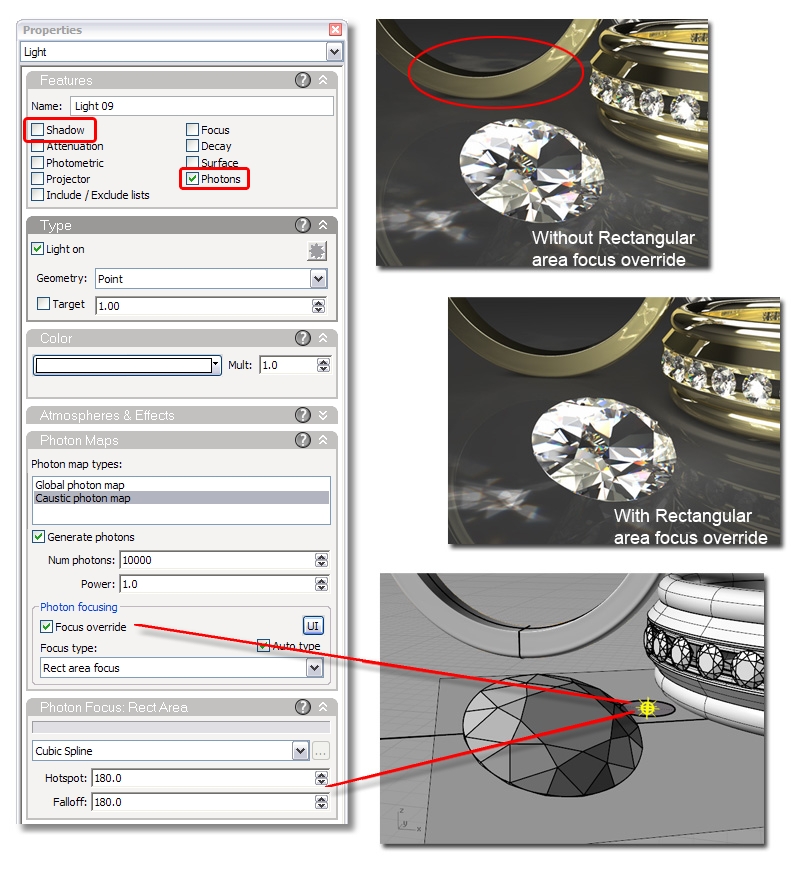
To create the effect of caustics in this rendering, light sources in addition to Skylight must be used. Two point lights are added to this scene - one on the ground plane beside the diamond and the other over the ruby in the ring on the left. The screen shot shows the Light Properties for the point light next to the diamond. The properties for any light object are accessible through the Rhino Properties dialog box.
Shadow
The Shadow option for this light has been disabled, since we only want to add sparkles and not darker areas in the render. This is not the physically-correct behavior of light, but with Brazil it is possible to only use those qualities of a light that add to the desired effect.
Photons
The Photons option is required for this light to produce the caustic effect. The other point light in this scene is not creating caustics but is still adding light. Brazil lets you set photon parameters individually for each light in the scene.
Focus override
The Focus override alters the way the light emanating from the point light source is focused. Using the Rect area focus type, along with changing the Hotspot and Falloff values to 180 degrees, decreases splotches in the render.
These splotches are the result of the light from the point light source shining up and bouncing off of the underside of the ruby ring. The Max search radius value set in the Photon Map section creates the splotches shown in some areas. If we only focus the light to the sides and down, this reduces the artifacts.
The position of the point light in relation to the diamond is also of significance. Experiment to produce the desired look.
Materials
The materials used in this jewelry rendering are derived from Brazil materials. The silver and gold materials both started as a Brazil Chrome Material.
Silver
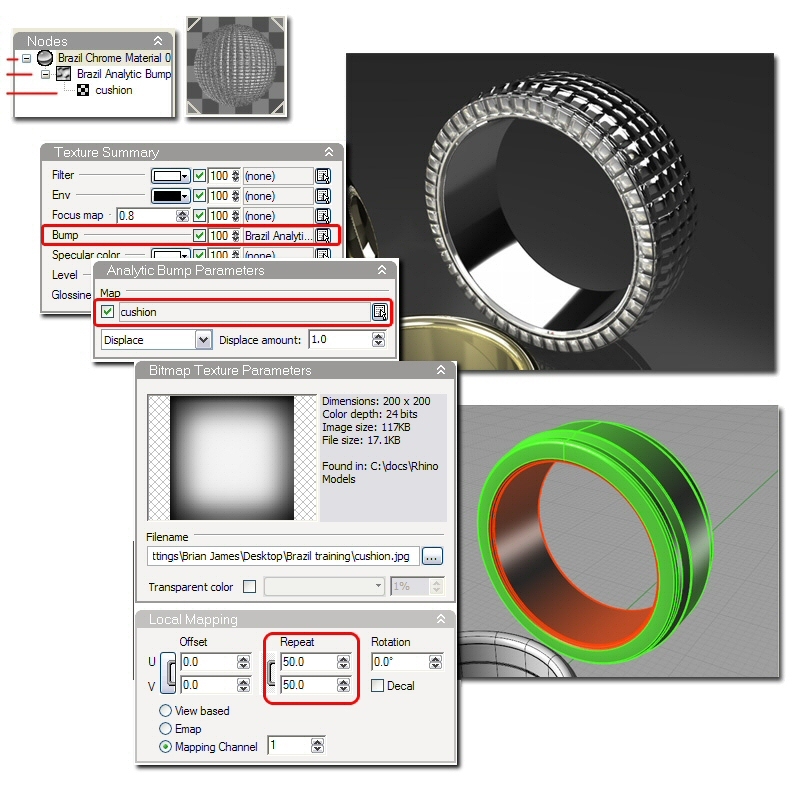
For the silver, the highlight parameters were changed from the defaults to alter the glossy look, but this is by no means required to make a metal shader. Compare the silver and gold materials in this file with the default Brazil Chrome Material to see the changes.
The screen shots show the Nodes for the silver cushioned material used in the scene. The only difference between the bumpy silver material and the normal silver material used for the inner surface of the textured ring is the addition of Brazil Analytic Bump Texture. The Analytic Bump Texture uses a bitmap image (cushion.jpg) that defines the bump map. This image is tiled using Local Mapping Parameters to distribute the bump along the ring.
The smooth silver material for the inner surface is a version of this same material without the bump map.
Gold
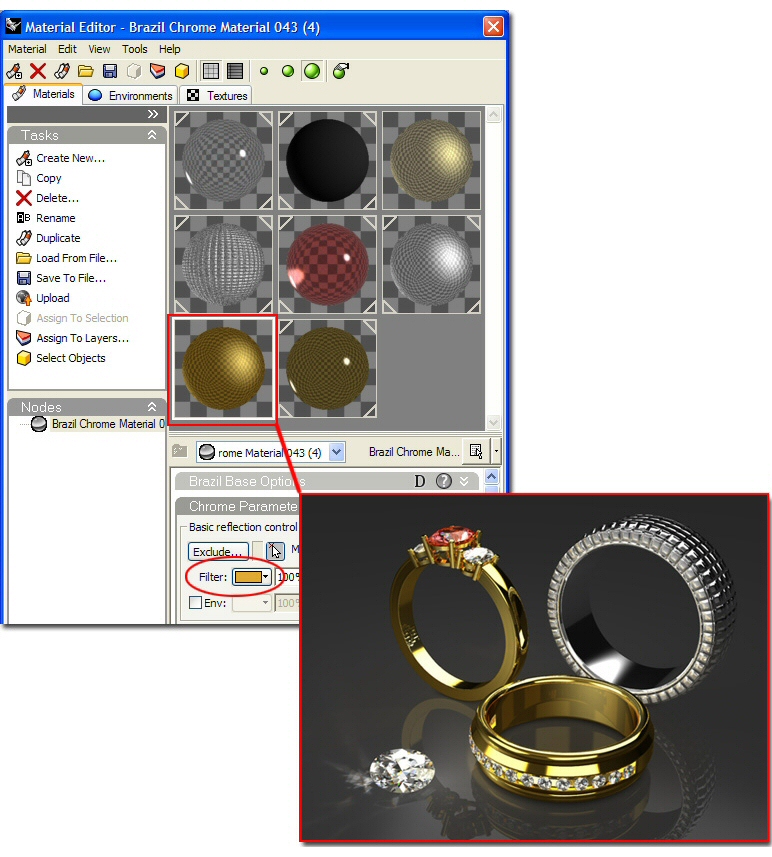
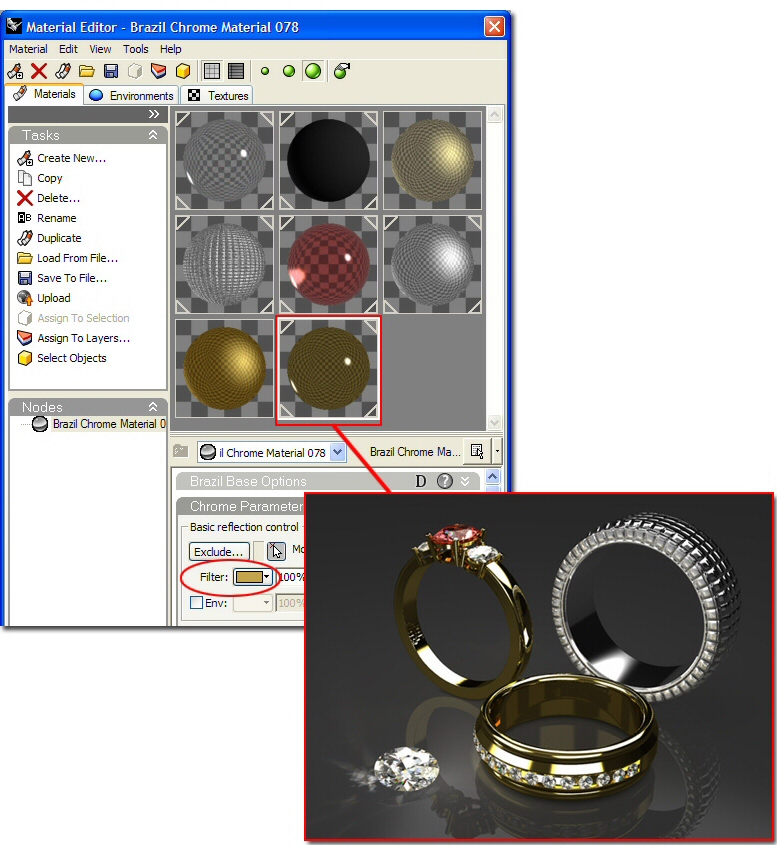
Just like the silver material, a Brazil Chrome Material was used as the base for the gold. Gold materials look different depending on the lighting and environment, but the Filter color in the Basic reflection control section makes the most difference.
Gold Variation
Two additional gold materials provided in the Brazil_for_Rhino_Jewelry.3dm sample file illustrate this subtlety. In the images below, the second gold material is a copy of the Brazil Chrome Material with the only the Filter color changed.
Gemstones
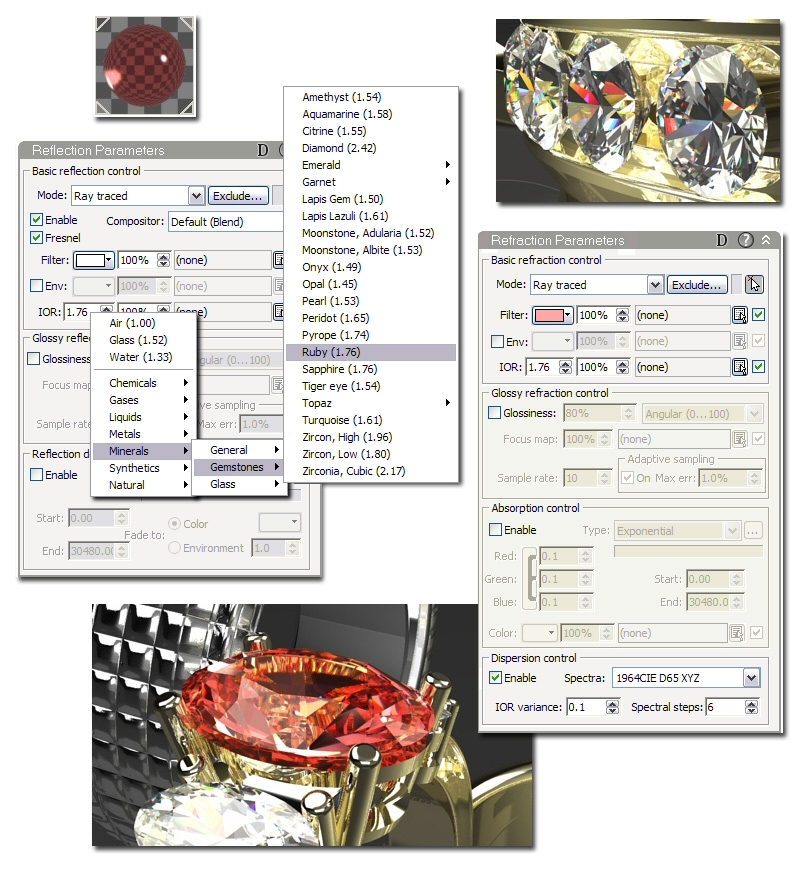
To make gemstone materials, start with the Brazil Glass Material. The Brazil Glass Material has settings for both reflection and refraction.
The index of refraction (IOR)settings for each of these sections control how the material refracts light. Right-click over each IOR edit box in the Material Editor to display a menu of predefined values.
Ruby Material Settings
- Reflection Parameters
- IOR=Ruby
- Refraction Parameters
- IOR=Ruby
- Filter color=Red. The Filter color setting specifies the color of the light passing through the stone.
- Dispersion control This setting enables spectral dispersion, the quality translucent materials can have when they separate white light into the colors of the rainbow. This setting adds flecks of color to the gemstone.
Diamond Material Settings
- Reflection Parameters
- IOR=Diamond
- Refraction Parameters
- IOR=Diamond
- Filter color=White
Environment
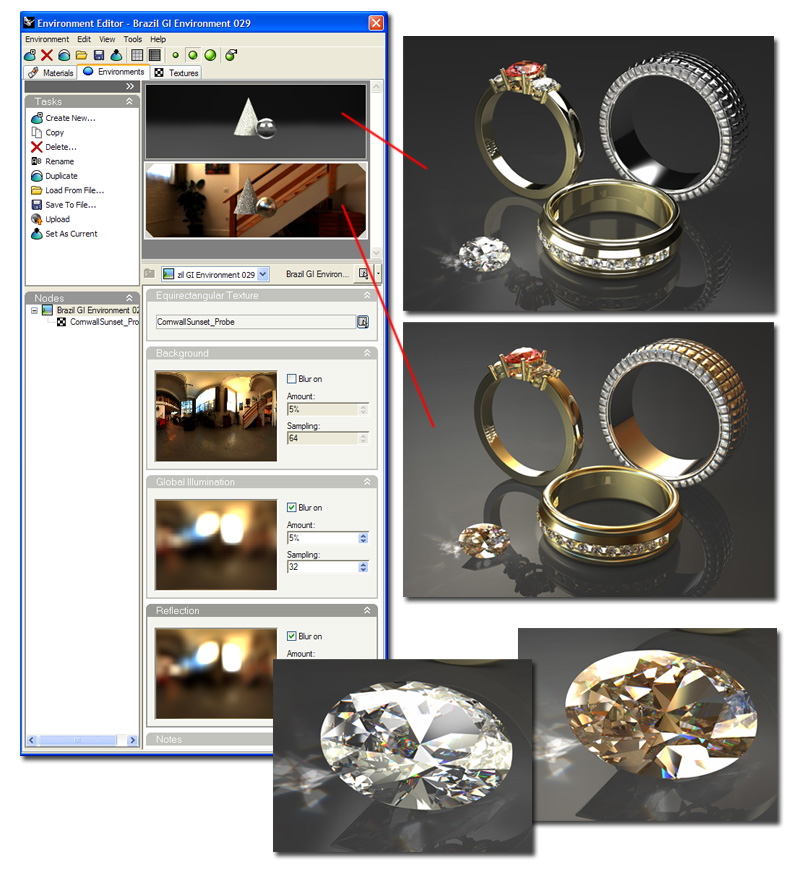
When rendering highly reflective objects, the environment has a big effect on the result. The demonstration file has two environments embedded in it for comparison. Both environments were based on the Brazil GI Environment, which accepts high-dynamic-range textures. The GI (global illumination) environment uses these textures for global illumination and for reflection in the scene. Changing the environments will change the look of the materials significantly.
In the case of the photographic HDR texture, the ability to blur the reflections was allowed in the GI environment. There are many free HDR textures available on the Internet.
Experimenting with different environments is a great way to use Brazil for Rhino without making changes to materials or lighting set ups.
